
How to use Microsoft Paint
Using Microsoft Paint to draw pixel dolls. This tutorial is from 2008.
There are several graphics programs available that are suitable for pixelling in, however Microsoft Paint comes preinstalled with most Windows based computers and it’s easy to use, which is why it’s featured here ^^
What is MS Paint?
Microsoft Paint (or MS Paint) is a bitmap based graphics program. Because it doesn’t make use of anti-aliasing and special filters, it can be used quite effectively for pixel art and is a good program to begin pixelling with.
For most people, to open Microsoft Paint, click on “Start” –> “All Programs” –> “Accessories” –> “Paint”

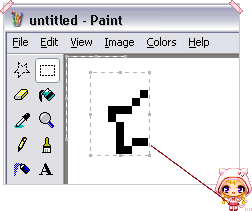
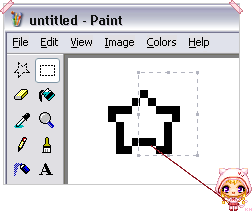
This is the screen you should be greeted with. The big white area in the middle is your “Canvas” and it’s where you’ll be pixelling. You have your “File” menu at the top to allow you to edit and save your work, your “Drawing tools” are on the left and your “Palette” of colours at the bottom.
Drawing Tools in Paint
I’ll show you the tools I most commonly use in Paint. The others you can just play around with to see what they do ^^
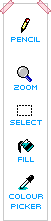
Pencil Tool
The pencil tool is used for gasp drawing! I also use it for erasing (just paint with white), because the eraser tool is too big and bulky.
Zoom
The zoom tool allows you to see what you’re working on easier.
Select
Select a rectangular area.
Fill
Fill an area with a block of colour.
Colour Picker
Grab a colour from the canvas. Tis very useful if you need to stick to a certain palette.
Choosing Colours
To change your foreground colour, left click on the colour you want to use. To change your secondary colour, right click on the colour you want to use.

The default colours aren’t really much use (except maybe for black and white). So, to pick and choose your own colours, go up to the Colours Menu at the top and click on the only option; “Edit Colours”.
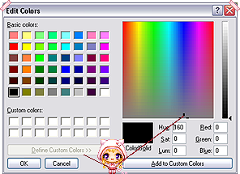
If you don’t get that whole dialogue box, click on the “Define Custom Colours” button ^_^ Dragging the cross-hair around will let you change the default colours. I would suggest not changing the colours black and white, because they’re pretty commonly used ^^; Once you’ve found the general colour you want, you can adjust the brightness by sliding the arrow at the right, then add it to your custom colours.
Flipping & Rotating
Sometimes you’ll have drawn half of an object and want to flip it, so it’ll be symmetrical.
To do this, select the half you want to flip and copy it (Ctrl+C or in the menu “Edit” –> “Copy”).
Then paste it (Ctrl+V or in the menu “Edit” –> “Paste”).
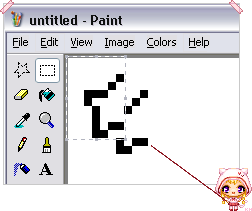
Flip Horizontal
Leaving the pasted area selected (don’t click away from it!), go up to the “Image” menu and select “Flip/Rotate”.
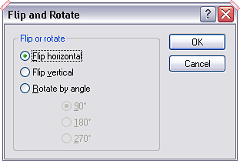
We want to flip the selection horizontally in this case, so we can just hit ok ^^
Lastly, just move the flipped image into place and there we go!
Play around with the other options to get used to what they do and how you can use them~
Saving Your Work
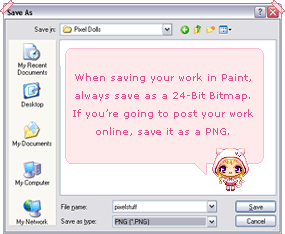
The first thing to learn from the File Menu is how to save your work! ^_^

To save your work, click on “File” and then “Save”. A dialog box will pop up so you can pick where you want to save your file and what you want to save it as. When saving in Paint, NEVER save as a GIF or JPG (it screws it up terribly). Only save as a BMP or a PNG.
Final Words
There are many other bits and pieces you can do within Paint, however I’m going to leave them up to you to find – you should have the basics with the points shown here, so just start exploring and go for it! ^^