
Drawing Bases
Drawing your own pixel doll bases in an anime or chibi style.
Another highly requested tutorial XD I wasn’t sure how to portray this efficiently, because there’s so many possibilities.
Sketching a Large Base
Bases come in all shapes, sizes and styles. So before I start to draw a base, I think about the type of base I want to make. Usually I have a doll or project in mind, so that generally narrows it down a lot.
If any keywords or ideas come to mind, write them down, or sketch the basic idea out.
For me, I’ve chosen: Girl, anime, jump, schoolbag.
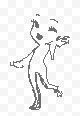
Hopefully I can show the workings of a few bases in this tutorial, but I’m going to start with a larger anime-styled base.
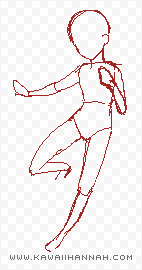
Step 1

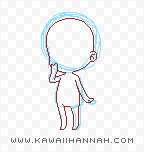
First of all, I draw a circle. It doesn’t have to be a perfect circle, I just scribble the rough shape of one ^^ This will be the placement for the head.
Step 2
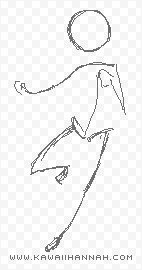
Yes, a stick figure. If you find drawing bodies difficult, try using a stick figure to begin with, as a basic skeleton. It will help in determining the proportions you want to achieve.
I usually draw a line for the shoulders in, then draw a curving line for the spine. At the bottom of the spine, I add lines to indicate the hips. Then, I add sticks for the legs and arms. I indicate the hands and feet with oval-type shapes.
Check that the proportions are as you want them. If the arms/legs/body are too short/long, don’t be afraid to change it now. You can even change the size of the circle if you think the head is too big.
The stick figure should show the overall pose you are looking to achieve. I wanted one of the arms to be up, as though she was holding a strap on a backpack. I also wanted the pose to be off-balance, as though she were between a jump and a run.
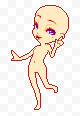
Step 3

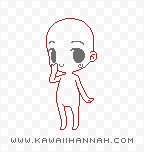
Draw in the jaw-line. I’ve chosen your very typical anime jaw-line. You could round off the chin, draw a different jaw shape, whichever you like.
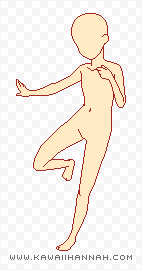
Step 4
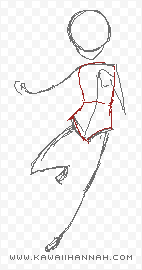
Now we can begin drawing shapes around the skeleton. It’s probably easier to draw them in a different colour to the stick figure, so you can differentiate each piece properly.
Sometimes I split the body into 3 parts, chest, middle and hips. But in this case I’ve only done the two, splitting it at the waist.
Most of the pieces I draw for the body are just cylinders – some are tapered towards the top or bottom, such as the lower leg, tapers inwards towards the ankle.
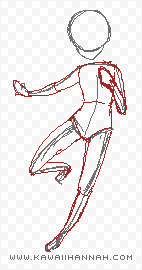
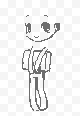
Step 5
Hopefully a simple step – remove the stick figure and you should be left with your body sketch.
Here I’ve also added a couple of things, notably, the shoulders and neck.
I also removed part of the circle on the head (where it was going into the face area) and added an ear.
Time to check that you’re happy with the overall base look. If you’re not, make some changes.
You will be able to change other things later (like thinning down parts of the arms/legs or body), but if you’re not happy with the pose, it’ll be a big pain to change that XD
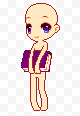
Line Art & Palette
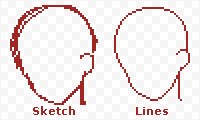
Alright, with the sketch done, you can refine the lines to get your line art. To do this, you can either erase parts of your sketch, or trace over the sketch in another colour to create the lines. The lines should be 1 pixel thick.
There are a couple of exceptions – I have a thicker line around the heel of the foot on the leg that is up, to help show where the leg ends and the foot begins. I also have some pixels joined to indicate fingers. I often anti-alias those later.
I changed a couple of things once I’d done the line art – the angle of the leg touching the ground was changed and the hands were adjusted slightly.
Colour Palette
At this stage, you should start thinking about your colour palette.

For my base skin layer, I usually opt for a peach colour – essentially, it’s lightened orange, closer to yellow than red XD You could choose a colour more pink (towards the red shades), or go for darker skin-tones instead. You could even offer a range of colours.
Once you’ve got your base colour, the shadows will simply be a darker version of that. Normally I start to head into the pinker shades (or slightly purple) as I’m shading. And if I add highlights, I start incorporating a bit more yellow.
For the outline, I use either a dulled red-brown or a dulled red-purple.
If you’re stuck for ideas, feel free to use the palettes below as a starting point for yours ^_^

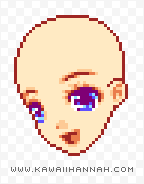
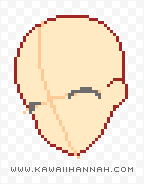
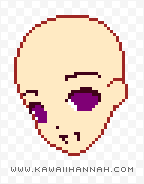
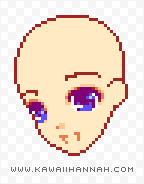
Drawing a Face
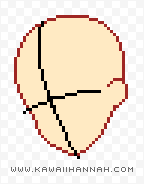
Sometimes people don’t draw faces on their bases, but I often do ^^ To the left is a guideline to show how I place my faces.
Generally I actually place my eyes in proportion to the ear placement – with the corner of the eyes matching where the top of the ear joins the head.
Sometimes you might have them higher or lower, depending on your style/view/how big the eyes are.
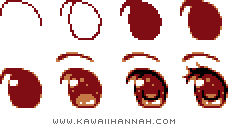
Eye-deas
Ok, eyes. I usually start with the eyes. Probably because on most of my bases, they take up the majority of the face XD To the right are a few different styles of eyes.
Please don’t go and copy them straight onto your base (or copy pixel for pixel), try to see how the structure works and then you can draw your own ^^
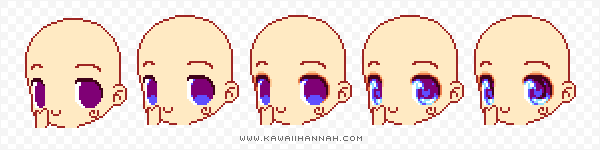
Step 1
I start with the eyelashes / the top of the eye.
To change things around a bit, try curving the shape more, or making it more angular. It all depends on the style of eye you’re going for.
If I want to draw eyes like dots (such as the 2nd example above), I would just draw circles instead of going through this step.
Step 2
Now I’ve effectively drawn a squashed circle underneath the line we drew in the previous step.
This is actually what I would consider to be the “iris” of the eye. I often don’t outline the eye whites and add them in when colouring.
You can experiment with different styles, such as a rounded eye, thinner, or more flat.
Step 3
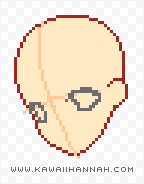
Sketch the remainder of the face XD I don’t like colouring the eyes until I have at least the mouth in placement.
I also changed the colour so I could see better. The grey was a pain XP You can get rid of the guidelines once you’ve got the face in place.
On the subject of eyebrows, mouths and noses – they come in all shapes and sizes. You can have big, bushy eyebrows, thin, highly arched ones or your average thickness. You can place them closer to the eyes, or further up the head – placing them high can make the base look cuter, but just be aware of where people will place the hair XD
Noses can be big or small, thin, short, long, broken (ouch), or even non-existent! I often leave noses out on chibi bases.
Mouths too – a large smile, small rosebud lips, pouting lips. In this case I’m not going to show the lips, but have an anime-styled open mouth.
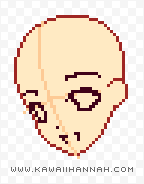
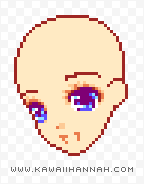
Step 4
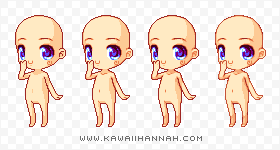
On the left, I’ve flat-coloured the iris in purple and coloured the eye-whites white.
On the right, I’ve added the specular shines – larger white ones at the bottom, with a single blue pixel towards the right hand corner. Some people actually don’t add these highlights on their eyes, it all depends on the style you want to achieve. I also added a line of white pixels on the right side of the right iris.
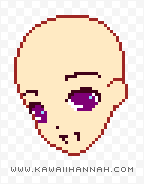
Anti-aliasing the Face
Anti-aliasing the eyelashes. At the moment the colour contrast of the eyelashes and the skin tone is quite stark, so they look very harsh.
To change this, we can use base shadow colours and a mix of the base colour and outline colour to create a blend between them. If it sounds difficult, it’s actually very simple to do.
First Colour
I’ve used the base outline colour and placed it where the corner of the curves are.
Second Colour

Here, I’ve used a colour between the base colour and the outline colour (a slightly dull, dark peach). I’ve gone around parts of the outer eyelashes. I also changed the colour of the nose and mouth.
Third Colour
This last colour is what will end up being one of the base shadow colours. I used that around most of the top curve, which helps to smooth it out better.
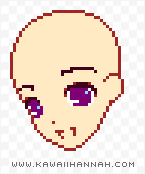
Shading the Eyes
With the eyelashes finished, we can now shade the eye. I often start by adding a lighter colour at the bottom of the iris. I start out with it being a side-ways oval and take a chunk out of the top for the pupil of the eye. So it looks a bit like a crescent moon pointing upwards. I’ve also anti-aliased the specular highlight in the top right of the eye.
You can probably also notice that I changed the colour of the eyelashes. Sometimes it’s fun to change things a bit and see how they look XD I liked the purple hue it gave to the eye, but you can always leave the darker colour if you like that better ^^
Anyone for mascara? XD
Larger eyelashes can be fiddly to get looking right. I try to have the lashes with a gap of 1px in between and use the base shadow colours to draw them in with.
Obviously it’s an optional step XP I don’t generally use them on a more unisex base because it creates a very feminine looking eye.
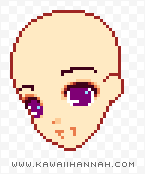
Big jump? I’ve anti-aliased the eyebrows here, in the same way we anti-aliased the eyelashes.
The mouth was done in a similar way, but I darkened the inside, because inside your mouth is dark (unless you swallow a torch – which is NOT recommended XD).
I made some final adjustments to the eyes as well, changing a few pixels here and there.
Shading The Large Base
You could choose to leave the base unshaded – I’ve personally been stripping the base down to flat colours, so it allows more freedom to change the shading style.
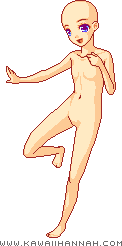
Otherwise, these are the steps I took in shading the base. For a non-animated version, click here. If you’re wondering HOW to shade things, please check my shading tutorial – the base is made up of mostly cylinders and spheres, so you should be able to guess within reason to shade it ^_^
The Finished Base
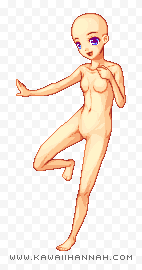
I was going to leave it at the last step, because I didn’t think it needed more colours added, but that did leave some quite harsh shadows.
So I added two more layers of shading, one in between the base skin tone and the first layer of shading and the other colour, was used to highlight the skin in areas.
I would probably remove those two layers when I make a doll, if I was aiming to keep the colour count down.
Drawing a Chibi Base
With all of the above information in mind, here’s a quick example of how I draw a chibi base. With chibi bases, I don’t generally bother with a skeleton, because I like drawing tiny jelly-bean bodies.
Step 1.
Draw a circle. (No, really? Yeah…)
Step 2.
Draw a jelly-bean blob shape underneath the circle. This will become the body, so feel free to make it long, short, skinny, chubby, or even to split it slightly into two sections (torso and hips).
Step 3.
The jaw-line. Nothing revolutionary here. I often use quite rounded jaw-lines for my chibis.
Try any jaw-line you like – a superhero one would be highly amusing.
Step 4.
Arms and legs! These are also really basic. Literally just cylinders.
I have flattened the cylinders off at the bottom to indicate feet. You can make the feet larger if you like. Or longer arms/legs.
So far, this base sketch has taken about 40 seconds XD Far less time than to write about it D:
Step 5.
Decided to turn the sketch blue so I could see the final body lines better. The final lines are drawn in the base outline colour.
You can see that I moved the body inwards a bit on the right hand side, slightly shortened the arm/hand on the right hand side and drew the top of the head on the inner part of the sketch circle. Added an ear too, that I forgot to draw in the sketch XD
Step 6.
Sketched a face on. Remarkably, it’s not that sketchy… XD
I’ve tried to keep the face fairly simple. The mouth is literally just a “u” shape.
Also opted for some swirly cheeks for a change. Normally I just change the colour so there’s a slight blush, but meh XD Change is fun?
Drawing a Chibi Face
Here are the steps I took in drawing the eyes. You can see a non-animated version here. If you cross-check them with the steps for the larger base, I’ve used the same steps, minus the mascara effect this time XD Could probably have made the eyelashes a bit thicker though.


Here I’ve finished the face off ^_^ Basically it’s just anti-aliasing the eyebrows and the mouth. I’ve changed the colour of the swirly cheeks too.
Shading a Chibi Base
This is the last step – adding shadows and finishing off the base. I’ve only done very basic shades for this base. Click here for the non-animated version.

This chibi base is almost all cylinders XD Even the body. Don’t feel limited to chibis just standing there either, change the pose and have them jumping all over the screen! If you have some dolls in mind, that should help in creating poses ^^
Ideas & Thoughts
So if you’re struggling to come up with a base idea, or just like to consider other options, here are a few things that I go through when brainstorming base ideas.
Personality
The personality of a base can help to determine poses and face style. For example, a shy base, might have larger, innocent eyes, with modest or timid poses. A glamorous base might include lipstick and the poses may be more confident or flirtatious.
A base set could be made up of both types of poses, with alternative faces. It all depends on what you want to make.
Props
While many pixel doll bases don’t come with props, sometimes it’s neat to build them in. A base set built around reading glasses would be an interesting change. Or an artist base set with many poses suited for sketching or with pencils/pens.
Size
Under 50×50 pixels – between 70 pixels and 100 pixels tall? Or a really large base, that’s 500 pixels tall?
If you create a base sketch that’s too big or too small, you can always resize it to the size you need and trace over it ^_^
Style
While the personality might help to determine style, sometimes you might want to include other things as well. Perhaps eye styles, or the overall drawing style (realistic, anime, chibi).
Alright, right before the end, here, have another eye-step-by-step XD This one is drawn using 4 colours.

And that’s it for this tutorial! I hope you have fun drawing bases for your pixel pieces~