
Animation Tutorial with GIMP
Animation is one of the most common tutorial requests I get, so I’ve decided to do a basic one to introduce animating on a blinking doll.
In this tutorial I will be using the free graphics software GIMP to do the animation. Windows users can download GIMP here. At the time of this tutorial, the current version is 2.6.8.
Frames and Frame Delay
The animated pixel art you see on my site are called animated “gifs” – gif is a type of image.
An animated gif is made up of many pictures called frames.
Each frame is slightly different to the previous one and is set to appear for a certain amount of time. This time is called the “frame delay“.
Often the frame delay is only part of a second before it moves to the next frame. The shorter the time delay, the faster the animation.
Planning the Animation

Before we start drawing anything, we need to know what we want to make. Blinking is one of the easiest things to start with, so that’s what we’re going to do.
So, what movements are involved in blinking? Eyes open, eyes closed. Two states and therefore at least two frames are necessary.
Plan A

I’ve animated the two frames we had in our plan and you can see that this will work as an animation (especially if you want a fast blink), but it still looks pretty static and the animation itself is quite sharp.
To fix the sharp movements, we need to add frames in between.
 Plan A.1
Ok, now we’ve got 4 frames. Eyes open, half open, closed, half open and then it repeats. Comparing the previous example, you can see there’s an obvious difference. The transition between frames appears much smoother.
Opening GIMP
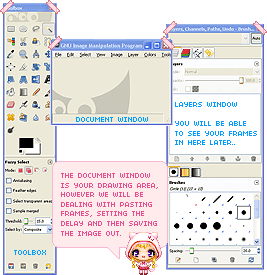
With our frames planned out, we’ll open GIMP. You’ll be greeted by a few windows; your toolbox, layers and the document window (which should be empty).
Because this is an animation tutorial, I’m not going to go into the tools, only using the layers window for animation frames and saving it out.
Adding the Frames
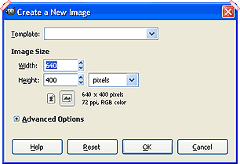
Our step now is to create the document for the animation in the “Document” window. To do this, click on the File Menu and select “New”.
The left dialogue box will appear. If you know the pixel size of your animation, add the width and height in. If you don’t, estimate and you can trim it down later. Hit ok and your document is ready to draw on / paste frames into!

To the right are my frames, ready to be pasted in separately. I have filled the parts I want transparent with green.
Now, select your first frame (in whatever program you’ve drawn it in) and “Copy” it (Ctrl+C / Edit->Copy).
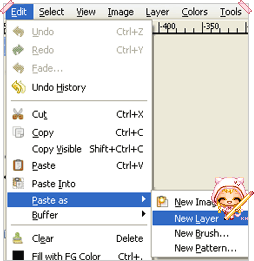
In GIMP, paste the frame in, by going to the Edit Menu, down to “Paste as” and across to “New Layer”.

That’s our first frame.
![]()
To remove the green and make it transparent, use the Magic Wand tool. I unticked the “Antialiasing” checkbox in the toolbox because we don’t want it. Click on the green areas and hit “Delete”. To select nothing again, go to the Select Menu -> None (Shift+Ctrl+A).
Now you can add the remainder of your frames as new layers and make them transparent.
Setting the Frame Delay
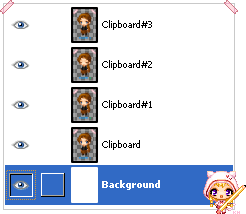
All of my frames are pasted in and made transparent. Now I need to delete the background layer. To do this, click on it – the blue means it’s the “active” layer. Next, click on the trash can icon to delete it. If you see a checker-board behind your frames, that’s fine, it shows the frames are transparent.
To set the frame delay in GIMP, you specify it in the layer name. Double click on the name (in my case, “Clipboard”) and type your time in brackets, then hit Enter.
You must write it as ([time here]ms) for it to work. This is the delay in milliseconds before it moves to the next frame.
- 1000ms = 1 second.
- 500ms = 1/2 a second.
- 200ms = 1/5 a second.
- 100ms = 1/10 a second.
The most common ones I use are 200ms and 100ms unless I want a frame to stay there longer. I have chosen 1000ms for the first frame, because I want the eyes to be open for a second before closing again.
Saving the Image
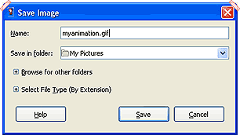
To save the image, go to the File Menu -> Save As (Shift+Ctrl+S).
Name your animation – mine is simply called myanimation and I have added the extension .gif making it “myanimation.gif“.
Choose the folder you want to save your animation to as well and hit “Save”.
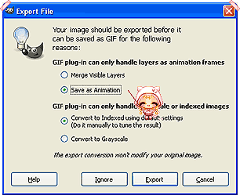
Low and behold, another box! ^^ Make sure you change the first option to “Save as Animation“.
With the second options, the first one about Indexed colours should be chosen automatically. The gif format can only use 256 different colours and if you have more than that, it will reduce the number until there are only 256. In most cases of pixel art, you won’t get to 256 colours in a single piece.
Now, hit “Export”.
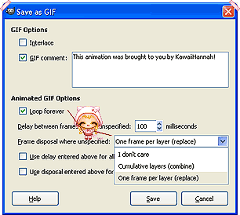
It’s the last box, I swear << You can add a comment here if you want, but it’s not necessary.
The option “Looping Forever” should default be checked. As it says, it will make the animation loop forever, so it’ll constantly cycle through the frames.
The second option you need is the Frame Disposal – you must change this to “One frame per Layer (Replace)”. You won’t notice a difference without this option when blinking, but you will when you start moving arms / legs / hair / clothes, or making it float etc, so it’s good practice to change it now.
 Hit “Save” and that’s it!
You can now go to the folder you saved it in and gaze in wonder as it moves before your very eyes! Ok, moving on…
Less Predictable Animation
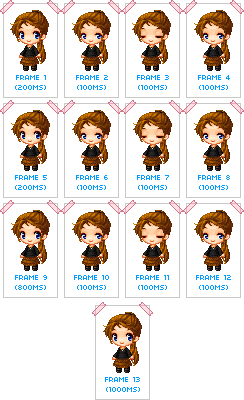
The animation you made and saved out in the previous steps should work and look fine, but the blinking happens just like clockwork.
To change the rate between blinking and make it appear slightly more random, we can add more frames. Ideally, I would usually have blinking done with two blinks close together and then another blink spaced further out unless I’m trying to keep the number of frames down.
Here I have a total of 13 frames. I’ve also added the time in milliseconds underneath to show how long the frame appears for.
 You can see the animation blinks three times before repeating. It first blinks twice closely together (within 600ms), then stops for nearly a second and blinks again before stopping for a whole second.
This helps to break the monotony of having the animation blink just once before repeating.
Try changing the frame delays and find what suits you – and try the animation with different sized pixel art to see what effect it has. Don’t forget that if the animation appears to jerk, or is moving too sharply, try adding a frame in between to smooth the movement.
The End~
And that’s it for this tutorial! I hope you’ve managed to use GIMP to create an animation. Some of you may find other programs easier to use, but GIMP is freely available and if you know how to use it, it’s quite powerful.
If you have the time, I suggest trying out some of the drawing tools and perhaps reading some of the tutorials found on the GIMP website ^_^
